Proxmox Linux Container
Running NixOS as a ProxmoxVE LXC container
With a small amount of work, it is possible to use NixOS as a LXC container under ProxmoxVE.
Finding a container tarball
These given instructions are known to be working in January of 2026 on ProxmoxVE v9.1 and NixOS v25.11. Hopefully these instructions will remain to be working for a while. Previous given instructions on this page were using the generic LXC-container tarball (nixos.containerTarball), these new instructions use the ProxmoxVE-specific LXC-container tarball (nixos.proxmoxLXC).
- Open a browser and navigate: [1](https://hydra.nixos.org/project/nixos)
- Navigate to the release you want to run (at this time: release-25.11). (small ones don't have the tarball we need).
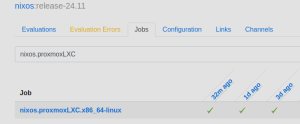
- Open the "Jobs" tab of the release
- Enter in the searchbar: nixos.proxmoxLXC
- Choose the latest successfull job and click on the corresponding checkmark icon to navigate.
- Under Build products, copy the link of nixos-image-lxc-proxmox-{release}-x86_64-linux.tar.xz to your clipboard. This is the download-link of the tarball. For example: https://hydra.nixos.org/build/319296903/download/1/nixos-image-lxc-proxmox-25.11pre-git-x86_64-linux.tar.xz
- Open your ProxmoxVE Web UI
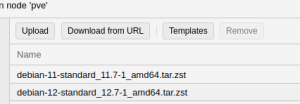
- Navigate to the CT Templates via the storage.
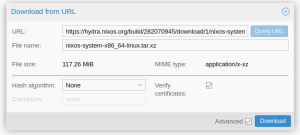
- Click the button Download from URL
- Paste from the clipboard the download link and initiate the download.
ProxmoxVE CLI Create container
In the Shell of your ProxmoxVE host, create a container using the following snippet:
ctid="99999"
ctname="nixos"
ctt="local:vztmpl/nixos-image-lxc-proxmox-25.11pre-git-x86_64-linux.tar.xz"
cts="local-lvm"

pct create ${ctid} ${ctt} \
  --hostname=${ctname} \
  --ostype=nixos --unprivileged=0 --features nesting=1 \
  --net0 name=eth0,bridge=vmbr0,ip=dhcp \
  --arch=amd64 --swap=1024 --memory=2048 \
  --storage=${cts}
In the above snippet it might be that you have to replace the default storage names local and local-lvm to your specific storage names. For instance when using BTRFS for your ProxmoxVE host this will probably be both local-btrfs as storage-names.
If the snippet ran succesfully, you should have a stopped NixOS container. You now to increase the disk size, start the container and "enter" it:
pct resize ${ctid} rootfs +2G
pct start ${ctid}
pct enter ${ctid}
Upon "entering" the container, you should now see the prompt of the container.
Now do:
source /etc/set-environment
passwd --delete root
nano /etc/nixos/configuration.nix
You should now be in the editor "nano". Add the following minimal NixOS configuration to have an easy accessible NixOS container:
{ config, modulesPath, pkgs, lib, ... }:
{
  imports = [ (modulesPath + "/virtualisation/proxmox-lxc.nix") ];
  nix.settings = { sandbox = false; };
  proxmoxLXC = {
    manageNetwork = false;
    privileged = true;
  };
  security.pam.services.sshd.allowNullPassword = true;
  services.fstrim.enable = false; # Let Proxmox host handle fstrim
  services.openssh = {
    enable = true;
    openFirewall = true;
    settings = {
        PermitRootLogin = "yes";
        PasswordAuthentication = true;
        PermitEmptyPasswords = "yes";
    };
  };
  # Cache DNS lookups to improve performance
  services.resolved = {
    extraConfig = ''
      Cache=true
      CacheFromLocalhost=true
    '';
  };
  system.stateVersion = "25.05";
}
Save the file using the key strokes <CTRL+O>, <ENTER> and <CTRL-X>. We're now going to switch to the NixOS configuration:
nix-channel --update
nixos-rebuild switch --upgrade
That's it! You now have a running NixOS-container. Via the ProxmoxVE UI you can open the console and log on as root, no password is needed. If you don't see the login prompt, you can trigger it to appear by pressing the ENTER key once.
For resolving errors you might want to use resolvectl, ifconfig and journalctl -ef
Running NixOS Plasma Desktop as a ProxmoxVE LXC container
This is not a supported/adviced setup. So only use this configuration if you know what you are doing.
This procedure continues after the setup of the LXC-container as described in the previous chapter. This procedure will bind physical devices to the LXC-container.
Ensure the container is stopped!
pct stop ${ctid}
pct resize ${ctid} rootfs +8G
Configure the container as unconfined:
cat <<EOT >> /etc/pve/lxc/${ctid}.conf
lxc.apparmor.profile: unconfined
lxc.cap.drop:
lxc.cap.drop: sys_time sys_module sys_rawio
lxc.cgroup2.devices.allow: a
EOT
Bind the display of the host to the container
cat <<EOT >> /etc/pve/lxc/${ctid}.conf
lxc.mount.entry: /dev/dri dev/dri none bind,optional,create=dir
lxc.cgroup2.devices.allow: c 226:* rwm
lxc.mount.entry: /dev/tty7 dev/tty7 none bind,optional,create=file
lxc.cgroup2.devices.allow: c 4:7 rwm
lxc.mount.entry: /dev/tty0 dev/tty0 none bind,create=file 0 0
lxc.mount.entry: /dev/tty8 dev/tty8 none bind,create=file 0 0
lxc.cgroup2.devices.allow: c 4:8 rwm
lxc.mount.entry: /dev/fb0 dev/fb0 none bind,optional,create=file
lxc.cgroup2.devices.allow: c 4:0 rwm
lxc.cgroup2.devices.allow: c 29:0 rwm
lxc.tty.max: 6
EOT
Bind your input-device (mouse/keyboard)
cat <<EOT >> /etc/pve/lxc/${ctid}.conf
lxc.mount.entry: /dev/input dev/input none bind,optional,create=dir
lxc.cgroup2.devices.allow: c 13:* rwm
EOT
Bind fuse
cat <<EOT >> /etc/pve/lxc/${ctid}.conf
lxc.mount.entry: /dev/fuse dev/fuse none bind,create=file,optional
lxc.cgroup2.devices.allow: c 10:229 rwm
lxc.mount.auto: cgroup:rw
lxc.mount.auto: sys:rw
EOT
Bind sound-device to container
cat <<EOT >> /etc/pve/lxc/${ctid}.conf
lxc.mount.entry: /dev/snd dev/snd none bind,optional,create=dir
lxc.cgroup2.devices.allow: c 116:* rwm
EOT
Modify configuration.nix
pct start ${ctid}
pct enter ${ctid}
In the container shell:
source /etc/set-environment
nano /etc/nixos/configuration.nix
Replace the configuration with:
{ config, modulesPath, pkgs, lib, ... }:
{
  imports = [ (modulesPath + "/virtualisation/proxmox-lxc.nix") ];
  nix.settings = { sandbox = false; };
  systemd.network.wait-online.enable = false;
  security.pam.services.sshd.allowNullPassword = true;
  services.openssh = {
    enable = true;
    openFirewall = true;
    settings = {
        PermitRootLogin = "yes";
        PasswordAuthentication = true;
        PermitEmptyPasswords = "yes";
    };
  };

  proxmoxLXC = {
    privileged = true;
    manageNetwork = false;
    manageHostName = false;
  };

  services.desktopManager.plasma6 = {
      enable = true;
  };

  hardware.graphics = {
    enable = true;
  };

  users.users.system = {
    isNormalUser = true;
    home = "/home/system";
    description = "System user";
    extraGroups = [ "wheel" "networkmanager" ];
    shell = pkgs.bash;
    initialPassword = "Passw0rd!";
  };

  services.displayManager = {
    enable = true;
    sddm = {
      enable = true;
      wayland.enable = true;
      settings = {
        Autologin = {
          Session = "plasma.desktop";
          User = "system";
        };
      };
    };
  };

   # networkd depends on this, but systemd module disables this for containers
  systemd.additionalUpstreamSystemUnits = [ "systemd-udev-trigger.service" ];

  systemd.services.systemd-rfkill = {
    wantedBy = lib.mkForce [];
    enable = false;
  };

  environment.systemPackages = with pkgs; [
    pkgs.chromium
  ];

  system.stateVersion = "24.11";
}
Run:
ifconfig eth0 up
nixos-rebuild switch
reboot now
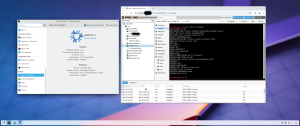
If this procedure worked, you should see Plasma desktop starting on the monitor of your Proxmox physical machine. The environment is created with a user "system" and password "Passw0rd!". Sometimes you need to switch TTY to see your shell again (<CTRL> <SHIFT> 1). The desktop environment is on TTY7 (<CTRL> <SHIFT> 7). Or use "chvt" on your proxmox host.
If you change the configuration.nix file and want to switch, don't forget to use "sudo".


